
Guide to Embedding 3D Models on Any Website
24 July 2025


Embedding 3D models on your website can enhance user engagement and provide a unique visual experience. This guide will walk you through the process of and embedding 3D models using our simple tool, making it accessible to developers of all skill levels.
Table of Contents

How to Add 3D Models to Your Website: A Complete Guide
Ready to add 3D models to your website? Try the Beltorion 3D Model embedder now! Transform your website with interactive 3D content in minutes.
Want to embed 3D models on your website but don’t know where to start? You’re not alone. Most website owners struggle with the technical complexity of adding 3D content to their sites. Whether you’re using WordPress, Webflow, or a custom website, the process often requires coding knowledge that many don’t have.
The web is no longer flat. From immersive product showcases on e-commerce sites to engaging educational models and interactive brand stories, 3D graphics are rapidly transforming the digital landscape. They offer a level of engagement and detail that static images and videos simply cannot match.
For many website owners, however, the world of 3D can feel intimidating. The
learning curve for libraries like WebGL and three.js is steep,
and integrating complex 3D logic into a traditional website can be a daunting
task.
What if you could bridge that gap? What if you could deliver a rich, interactive 3D experience to your users without needing to become a 3D programming expert?
That’s precisely why we built the Beltorion 3D Model Embedder . It’s a tool designed for website owners, empowering you to take a 3D model, customize its presentation in a live preview, and generate clean, performant, and framework-free code that you can embed into any website.
What is the Beltorion 3D Model Embedder? Your Gateway to Adding 3D Models
At its core, the Beltorion 3D Model Embedder is a no-code tool that writes code for you. It streamlines the entire process of creating an embeddable 3D scene:
Upload: Start with a standard 3D model file (like
.glbor.gltf).Customize: Use an intuitive interface to control every aspect of the scene in real-time—adjust lighting, camera angles, model scale, rotation behavior, and more.
Generate: With one click, get a complete package of self-contained HTML, CSS, and vanilla JavaScript.
The generated code is dependency-free, meaning it doesn’t require React, Vue, or any other library to run. It’s just clean, object-oriented JavaScript that “just works.”
How It Works: A Look Under the Hood for Developers
While the tool is simple to use, we built it on a robust and modern architecture. As a developer, you can be confident that the code it produces is not just functional, but also clean, understandable, and maintainable.
The Powerhouse: three.js
The live preview and the generated code are both powered by
three.js, the industry-standard library for 3D graphics on the
web. This ensures high performance, broad compatibility, and access to a
massive ecosystem of features.
The Control Panel: A Modern React UI
The settings panel you interact with is a modern React application. This allows for a fast, dynamic user experience with real-time updates to the 3D preview. Crucially, React is only used for the generator tool itself. The code you export is 100% vanilla JavaScript, ensuring it’s lightweight and universally compatible.
The Real Magic: Framework-Free Code Generation
This is the heart of the generator. When you adjust a slider or pick a color, you’re updating a JavaScript state object. When you click “Generate Code,” the tool performs these key actions:
Serializes Settings: It takes the entire configuration object—camera position, light colors, rotation speeds—and saves it into a clean
config.jsfile.Generates a Class: It produces a well-structured JavaScript class (
ModelViewer.js) that reads the configuration and sets up thethree.jsscene. The logic is neatly organized into managers (e.g.,SceneManager,RotationManager,MouseManager) to handle specific concerns like scene setup, animation loops, and user interactions.Provides Boilerplate: It also gives you simple
index.htmlandstyle.cssfiles, providing a clear blueprint for integration.
The result is code that a developer can easily read, understand, and even extend if needed.
Step-by-Step: Creating Your First 3D Model Embed
Let’s walk through the process. It takes less than five minutes.
Step 1: Prepare Your 3D Model
You’ll need a model in .gltf or .glb format. The
.glb format is often preferred as it packages all necessary data
(mesh, textures) into a single file. You can:
- Find free or paid models on platforms like Sketchfab.
- Commission a 3D artist.
- Export your own from 3D software like Blender.
Step 2: Upload and Customize in Real-Time
Open the 3D Viewer Generator, upload your .glb file, and watch it
appear in the preview panel. Now, the fun begins. Use the settings panel to:
Adjust the Camera: Change the Field of View (FOV) for a wide-angle or telephoto effect, and set the camera’s initial position.
Dial in the Lighting: Control the color and intensity of both the ambient (fill) light and the directional (key) light.
Configure Rotation: Set how the model behaves on hover, on drag, and when idle. You can control speeds and rotation limits.
Scale the Model: Ensure your model is the perfect size for its container.
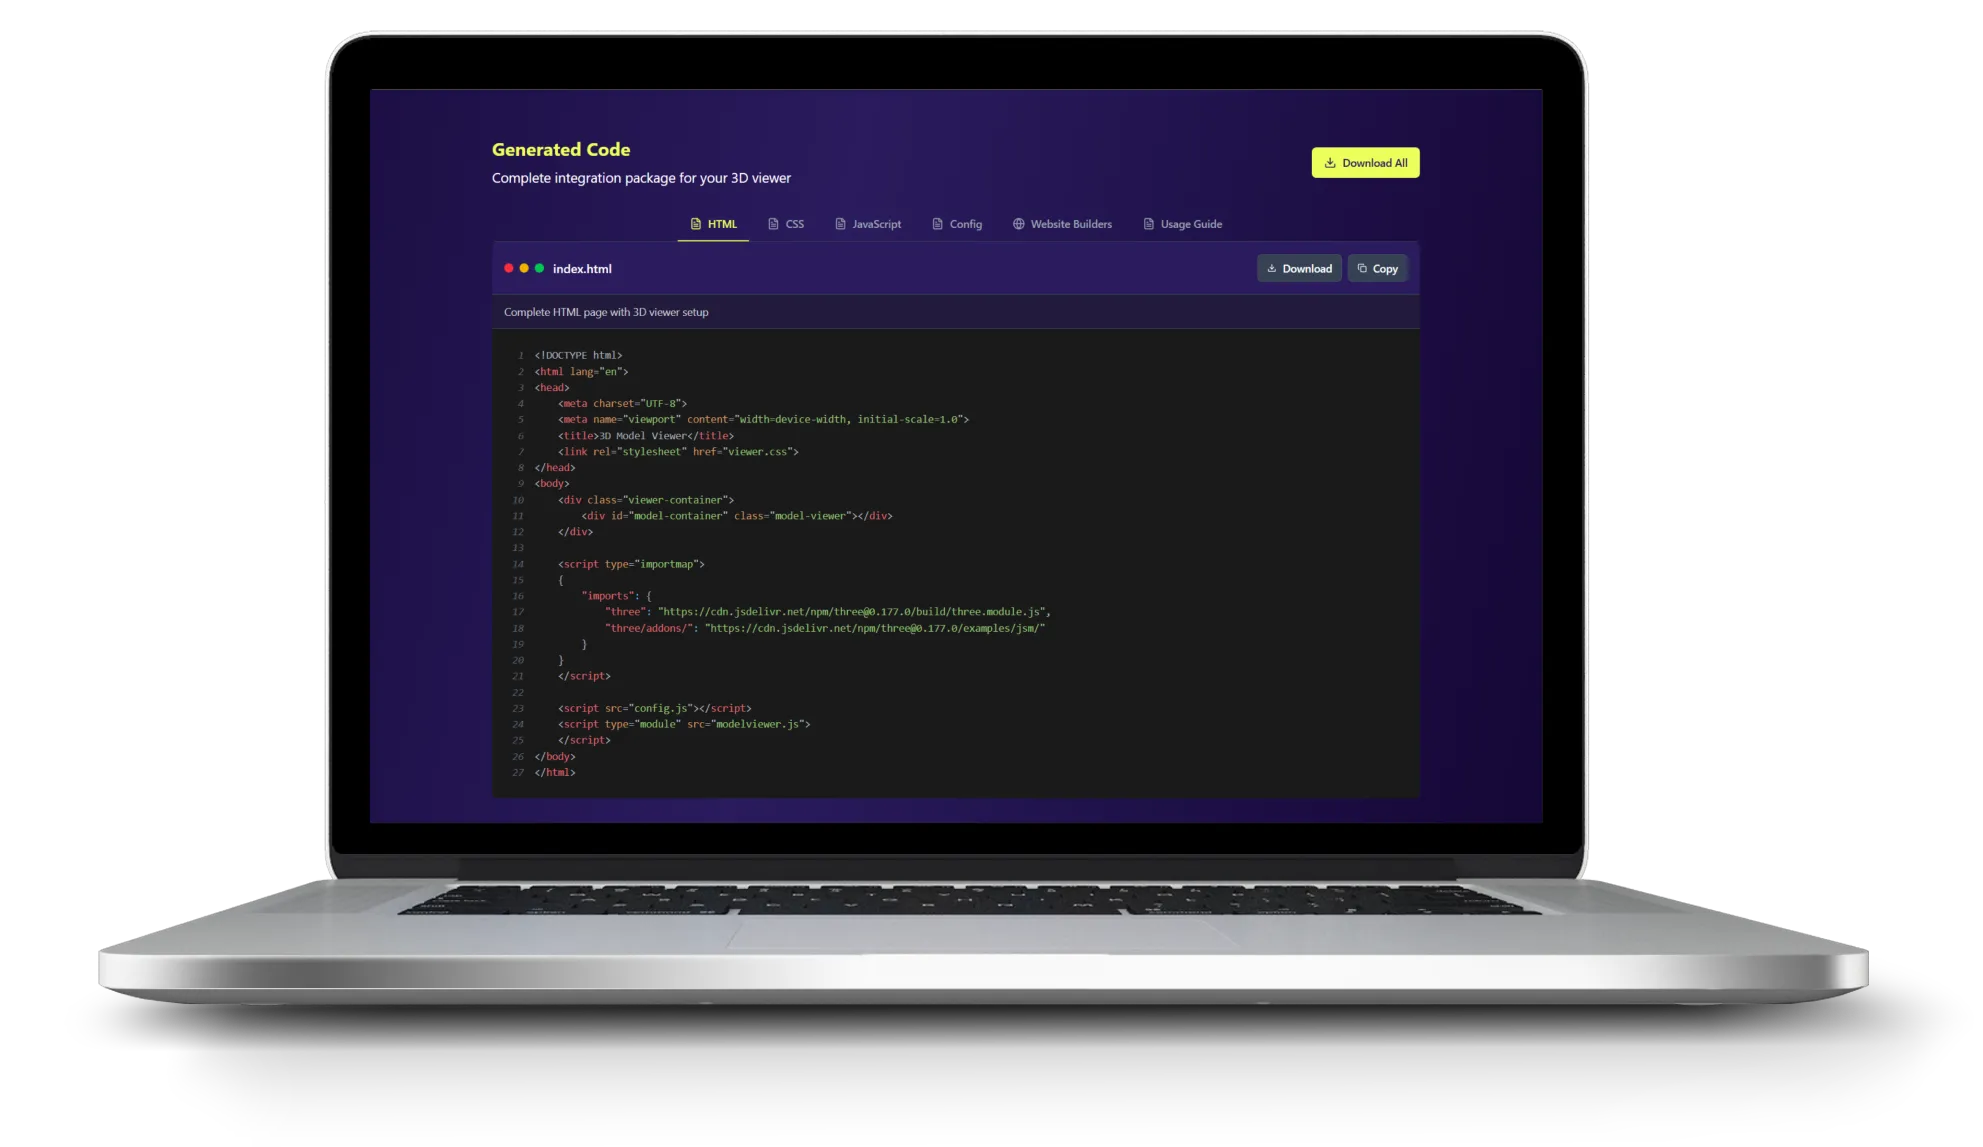
Step 3: Generate and Understand the Code
Happy with your preview? Click the “Generate Code” button. You’ll get access to several files:
index.html: The basic HTML structure, including the<div>container for your viewer.style.css: Minimal CSS to make the viewer responsive.config.js: The settings object you defined in the UI.ModelViewer.js: The main JavaScript class that brings your scene to life.your-model.glb: Your 3D model file.

Embedding Your 3D Model: A Multi-Platform Guide
Because the output is standard web technology, you can embed it almost anywhere.
The Universal Method
For any custom-built site, the process is:
Host the files: Upload
ModelViewer.js,config.js, and your.glbmodel to your web server or asset host.Add the HTML: Copy the
<div id=“model-viewer-container”></div>from the generatedindex.htmland place it where you want the viewer to appear in your page’s body.Link the CSS: Link to the
style.cssin the<head>of your HTML document.Link the JavaScript: Add the following
<script>tags just before your closing</body>tag, ensuring the paths are correct.
<script type="module">
  import { ModelViewer } from './ModelViewer.js'
  import { config } from './config.js'

  document.addEventListener('DOMContentLoaded', () => {
    new ModelViewer(config)
  })
</script>
How to Add 3D Models to WordPress
Host Files: Upload the
.jsand.glbfiles to your server via FTP/SFTP (e.g., in a folder within your child theme) or to your Media Library.Add Code: On the page or post where you want the viewer, use a “Custom HTML” block.
Paste & Edit: Paste the HTML, CSS, and JS from the universal method into the block. Update the file paths in the
srcandhrefattributes to point to where you uploaded your files.
How to Add 3D Models to Webflow
Host Files: Upload the
.jsand.glbfiles to a service like Amazon S3 or a host that gives you direct file URLs. You can sometimes upload JS files to Webflow’s asset panel if they are small enough, but external hosting is more reliable.Add Div Element: Drag an “Div” element onto your page where you want the viewer. In the settings of the element, set the id of the div the id what is in the Container Selector field int the basic settings of the tool. The default is
model-container. You can add a class to the div and style it as you want.Add Custom Code: In your Page Settings, go to the “Custom Code” section.
In the
Inside <head> tagarea, add the<style>tag with the CSS.In the
Before </body> tagarea, add the<script type=“module”>…</script>block.Remember to update the file paths to your externally hosted files.
Notes on Shopify & Other Platforms
The principle remains the same for platforms like Shopify:
Shopify: Upload your assets to
Settings > Files. Edit your theme code (.liquidfiles) to add the HTML container and link the scripts and styles, using Liquid’sasset_urlfilters to get the correct paths.
Real-World Use Cases: When to Embed 3D Models
Wondering how you can use 3D models on your website? Here are some practical examples:
E-commerce Product Showcases: Let customers rotate and examine products from every angle before purchasing.
Portfolio Presentations: Architects, designers, and artists can showcase their work in an interactive format.
Educational Content: Schools and training platforms can create interactive learning experiences with 3D models.
Real Estate Tours: Showcase properties with 3D floor plans and furniture layouts.
Gaming and Entertainment: Create interactive game assets or character showcases.
Manufacturing and Engineering: Display complex machinery or parts for technical documentation.
Beltorion vs. Other Methods: Why Choose Our 3D Model Embedder
There are several ways to add 3D models to your website. Here’s how our tool compares:
Manual three.js Coding
Pros: Complete control, no limitations
Cons: Requires months of learning, complex debugging, time-consuming development
Best for: Experienced developers with 3D programming knowledge
Platform-Specific Plugins
Pros: Easy to install, platform-optimized
Cons: Limited to one platform, monthly fees, restricted customization
Best for: Users who only work with one platform
Beltorion 3D Model Embedder
Pros: No coding required, works on any platform, one-time generation, full customization control
Cons: Requires basic file hosting knowledge
Best for: Website owners who want professional 3D content without the technical complexity
The SEO Advantage: Why Google Loves Interactive 3D Content
Beyond the “wow” factor, embedding 3D content has tangible SEO benefits. Search engines prioritize user experience, and interactive content significantly improves key metrics:
Increased Dwell Time: Users spend more time on your page interacting with the model, signaling to Google that your content is valuable.
Lower Bounce Rate: An engaging experience makes users less likely to leave immediately.
Higher Engagement: Clicks, drags, and other interactions are positive engagement signals.
Better Conversions: For e-commerce, allowing customers to inspect a product in 3D can dramatically increase buyer confidence and conversion rates.
Frequently Asked Questions About Embedding 3D Models
What file formats are supported?
Our tool supports the most common 3D file formats: .glb and
.gltf. These are web-optimized formats that work perfectly for
embedding 3D models on websites.
Is the generated code mobile-friendly?
Yes! The generated code is fully responsive and works on all devices including smartphones and tablets. The 3D viewer automatically adapts to different screen sizes.
Do I need to know coding to use this tool?
No coding knowledge required! The tool generates all the necessary code for you. You just need to upload your 3D model, customize the settings, and copy the generated code to your website.
Will the 3D model slow down my website?
The generated code is optimized for performance. It uses efficient three.js rendering and only loads when needed. For best results, keep your 3D model file size under 10MB.
Can I use this on any website platform?
Yes! The generated code is standard HTML, CSS, and JavaScript that works on any website platform including WordPress, Webflow, Shopify, and custom websites.
How much does it cost?
Our 3D Model Embedder tool is completely free to use. You can generate unlimited 3D viewers without any cost or subscription fees.
Conclusion: Start Adding 3D Models to Your Website Today
The Beltorion 3D Model Embedder is more than just a tool; it’s a new workflow. It empowers you to enhance your projects with immersive 3D content quickly and efficiently, using skills you already have. You get to focus on the creative vision while we handle the complex 3D boilerplate.
Ready to add 3D models to your website? Try the Beltorion 3D Model embedder now! Transform your website with interactive 3D content in minutes.

Viktor Gazsi
Related articles


Let's bring your vision to life!
Elevate your digital presence with our expert web design and development services.
Get Started